
How to Use an Eyewash Testing Gauge
By Samantha Hoch, Marketing Specialist, Haws
Eyewash testing gauges are an important tool when testing eyewashes and eye/face washes for ANSI Z358.1 compliance. Make sure you are utilizing it correctly with this quick guide.
How To Use An Eyewash Gauge
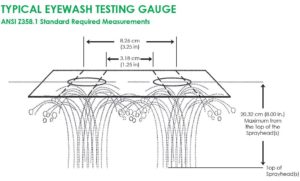
To determine a suitable eyewash pattern, the eyewash testing gauge should be a minimum of 4 inches in length with two sets of parallel lines equidistant from the center. The interior of the lines should be 3.25 inches apart. (Section 5.1.8)
STEP 1. Activate the eye/face wash. Note: If the eye/face wash is a part of a combination unit, ensure all other outlets are activated to confirm proper flow and simultaneous use. (Section 7.1)
STEP 2. Place the testing gauge in the streams of the eyewash. (Section 5.1.8)
STEP 3. The flushing fluid should cover the areas between the interior and exterior lines of the gauge at some point less than 8 inches above the eyewash nozzle. (Section 5.1.8)
This guest post was originally published in Haws Blog, June 28, 2016.
Recent Posts
-

The Best Cold Weather Gloves for Package Handlers and Delivery Drivers | PK Safety
Best Gloves for Package Handlers During the Holiday Season As the holiday season approaches, pa …Nov 11th 2024 -

Why Hi-Vis Winter Work Gear is Essential for Safety During the Cold Months | PK Safety
When temperatures drop and daylight hours shrink, outdoor workers face additional hazards that incre …Oct 31st 2024 -

Self Braking Descender: Advanced Rope Control for Fall Protection | PK Safety
For professionals working at heights, controlled descent is critical. Whether you’re a window cle …Oct 30th 2024